Themen durchsuchen
Verwendung der Innr App & Fernbedienungen
Sprachsteuerung hinzufügen
Video tutorials

Pairing Innr Zigbee bulbs with Philips Hue
Pairing Innr Zigbee bulbs with the Echo Plus
Tips and Tricks for connecting Innr Outdoor Lighting
How to Add an Innr Device to the Innr app
How to control your Innr lights using the Innr app
How to Use and Add Routines in the Innr app
How to use and set the Timer Automation in the Innr app
How to use and set a Sunrise or Sunset Automation in the Innr app
How to use and set a Wake Up or Go to Sleep Automation in the Innr app
How to Reset your Innr Outdoor products
How to Reset your Innr Zigbee retrofit products
How to Reset your Innr Smart Plugs
How to Reset your Innr Luminaires
How to Reset your Innr Ceiling Lamps
How to Reset your Innr WiFi bulbs
Download Produkthandbücher
Retrofit & Filament bulbs
- Quick Start Guide Innr Startertkits (SK 2xx)
- Installation Manual Z3.0 versions Bulbs Candles GU10 (BY 2xx, BF 2xx, RB 2xx, RF 2xx & RS 2xx)
- Installation Manuals Z3.0 version Bulbs (AE 26x)
- Installation Manuals Z3.0 version Bulbs (AE 28x)
- Installation Manuals Z3.0 version Flood Lights (BE 2xx)
- Installation Manual ZLL versions Bulbs E27 (BY 1xx & RB 1xx)
- Installation Manual ZLL versions Candles E14 (RB 1xx)
- Installation Manual ZLL versions Spots GU10 (RS 1xx)
- Installation Manual WiFi versions Bulbs (WBY 7xx, WRB 7xx, WRF 7xx, WRS 7xx)
Luminaires
- Installation Manual Puck Light Colour (PL 11x)
- Installation Manual Recessed Spot Light (RSL 110)
- Installation Manual Flex Light Colour (FL 130 C)
- Installation Manual Flex Light Colour 2m (FL 120 C)
- Installation Manual Flex Light Colour 4m (FL 140 C)
- Installation Manual Flex Light Colour 4m LED driver (FL 140 C /LD)
- Installation Manual Flex Light Color 6.5ft (FL 120 C /17)
- Installation Manual Flex Light Color 13ft (FL 140 C /17)
- Installation Manual Recessed Spot Light (RSL 115)
- Installation Manual Recessed Spot Light extension pack (RSL 115 spot)
- Installation Manual Round Ceiling Lamp White (RCL 110)
- Installation Manual Round Ceiling Lamp Comfort (RCL 240 T)
Control
- Installation Manual Bridge (BG 220)
- Installation Manual Bridge UK (BG 220 /05)
- Installation Manual Smart Button (RC 210)
- How to connect the RC 210 (Smart Button) to Philips Hue
- Installation Manual Remote Control (RC 250)
- How to connect the RC 250 (Remote Control) to Philips Hue
- Installation Manual Smart Plug EU (SP 220)
- Installation Manual Smart Plug EU (SP 240)
- Installation Manual Smart Plug EU (OSP 210)
- Installation Manual Smart Plug UK (SP 222)
- Installation Manual Smart Plug 10A US (SP 224)
- Installation Manual Smart Plug 15A US (SP 234)
- Installation Manual old Bridge (BG 110)
- Installation Manual Remote Control (RC 110)
- User Manual Remote Control (RC 110)
- Installation Manual Smart Plug (SP 120)
Outdoor
- Installation Manual Outdoor Spot Light 3-pack (OSL 130 C)
- Installation Manual Outdoor Spot Light extension pack (OSL 130 C spot)
- Installation Manual Outdoor Flex Light 2m (OFL 120 C)
- Installation Manual Outdoor Flex Light 4m (OFL 140 C)
- Installation Manual Outdoor Spot Light 3-pack US (OSL 130 C /17)
- Installation Manual Outdoor Spot Light extension pack US (OSL 130 C spot /17)
- Installation Manual Outdoor Extension Cable 2m / 5m (OEC 120 / OEC 150)
- Installation Manual Outdoor Pedestal Lights 3-pack (OPL 130 C)
- Installation Manual Outdoor Pedestal Light extension pack (OPL 130 CP)
- Installation Manual Outdoor Pedestal Lights 3-pack US (OPL 130 C /17)
- Installation Manual Outdoor Pedestal Light extension pack US (OPL 130 CP /17)
- Installation Manual Outdoor Power Supply (OPS 140)
- Installation Manual Outdoor Flex Light 2m EU 2021 (OFL 122 C)
- Installation Manual Outdoor Flex Light 4m EU 2021 (OFL 142)
- Installation Manual Outdoor Flex Light 2m UK 2021 (OFL 122 C /05)
- Installation Manual Outdoor Flex Light 4m UK 2021 (OFL 142 C /05)
- Installation Manual Outdoor Globe Light 3-pack (OGL 130 C)
- Installation Manual Outdoor Globe Light Extension (OGL 130 CG)
- Tips for enhancing the range of Innr Outdoor Lighting (cm)
- Tips for enhancing the range of Innr Outdoor Lighting (ft)
Quick answers
Top FAQs
Ask about our terms and conditions and contact us via email sales@innr.com.
Out of the box, your bridge may have an older firmware version without support for WPA3. In that case, please first connect your bridge with WPA2 security. If your WiFi router is configured to allow only WPA3, you have to temporarily configure it to allow WPA2 connections: in the settings of your router, choose “WPA2 Personal” or “WPA2/WPA3 Personal”, and if you see a setting “Enable PMF” then disable it or set it to optional. Your router will reboot to effectuate the changes. Then connect your bridge to your account following the instructions in the Innr app.
After you connect the bridge this way, it will automatically upgrade its firmware to the latest version. This will take a few minutes. When the bridge upgrade completes, it will restart. The LEDs on the bridge will turn off and then one by one turn on again. When all three LEDs are on, the bridge has restarted and will have made connection to your router again. If you changed your router’s configuration to allow WPA2, you will now want to change it back again to allow only WPA3. Your router will reboot again, and the Innr bridge will then automatically reconnect.
You can check in the Innr app and in your router’s settings to verify that your bridge is now connected with WPA3 security.
Innr works with all major players like Alexa (Echo devices with Zigbee radio), Hue, SmartThings and Homey. We test our products with these hubs and can also provide support.
For other hubs/systems (for example; Conbee / Conbee II or other Zigbee USB sticks in combination with deCONZ, Home Assistant, Domoticz, Homebridge, zigbee2mqtt and/or Hubitat) we cannot provide any support. All Innr products are either ZLL (Zigbee Light Link) or Zigbee 3.0 compliant. This means that they should work with other hubs that are ZLL (Zigbee Light Link) or Zigbee 3.0 compliant. If you have issues connecting or controlling your Innr devices with one of these hubs/systems, please contact the manufacturer of the hub/system or try to find a solution online.
You can download and install the Innr app in the App Store (Apple), Play Store (Android) or AppGallery (Huawei), or scan this QR code: it will take you directly to the Innr app in your store.

First create an account. Then open the Innr app, press the + button in the top-right corner of the app and choose “Add Device”. Now scan the QR code on the bridge or, if you can’t scan the QR code, choose “I Can’t Scan” and then choose “Innr Zigbee Bridge”. Then follow the rest of the steps in the App. The App provides on-screen Help to assist you in pairing the bridge.
![]()
Please make sure you’ve downloaded the Innr app (see logo), not the Innr app V1.
The Innr app V1 is an old version of the app that will only work with the old Bridge BG 110. If you have a question about adding the Innr app V1 to the old Bridge, please check the FAQ here.
- Open the app.
- Press the “+” button in the app and press “Add Device”.
- Scan the QR code on your light/bridge.
- Screw in your light and wait for the app to connect with the light.
- Select your WiFi network and connect to it.
- Select a room and add the light (this step does not apply to linking the Innr Bridge).
- Set up your Routines or skip this step to do it later on.
The account on the website and the account on the Innr app are two different accounts. Please create a new account on the Innr app.
If you have a light without a QR code on the side, or you see a QR code but your camera can’t scan the code, you can manually add the light to the Innr app:
- Open the Innr app, press the ‘+’ in the upper right corner and choose ‘add a device’.
- In the screen with the scanner, press ‘I can’t scan’.
- In the next screen, choose ‘Zigbee Light’ and press ‘next step’.
- Once the timer has started, switch on the lamps or turn off and on again in case the light was already on. This is the reverse order of what the app says.
- Wait for the light to be found in the next 120 seconds. The light will blink once when it’s found and connected.
- Then you will see a green check mark and “device added”. Underneath that, you have the option to change the name of the light and assign it to the right room.
- You’ll get the choise to add the light to Routines and Automations. You can do this immediately or add it later.
- Press ‘Done’ to finish the set up, or ‘Add more devices’ to add more devices.
When Innr lights are paired to a Zigbee system, they become part of the Zigbee mesh network, connected directly to the bridge or to another light in that network. This means that they don’t have to be close to the bridge; another Zigbee light or plug can function as a Zigbee ‘signal repeater’. In order to expand the range of your Zigbee system, place the Zigbee products inside your house within a distance of no more than 10 meters. Outside, the Zigbee signal will encounter less obstacles, so the range will go much further, up to 30 meters.
Below you will find our tips & tricks for connecting your Outdoor products:
- The smart part of the Outdoor lights is the control box. This control box should be in the best possible range of the bridge or a Zigbee light or plug inside the house. Make sure it is not behind any obstacles, especially not metal objects
- Connect the control box outside, preferably where you will place it. Make sure that the nearest indoor smart light(s) or plug(s) are switched on, so that they can serve as a ‘repeater’ for the Zigbee signal
- Make sure the control box is at least 15cm from the ground. If the control box is on the ground, the signal reception becomes a lot weaker.
- Insulating windows, especially HR ++ glass, can drastically reduce the range. Therefore, make sure that the signal does not have to pass through such glass, but rather through stone or wooden walls. The signal can pass through walls more easily.
Check out this file for a visual explanation, or watch this video.
No. In fact, you should not install any Innr light with a dimmer as the lamps can’t deal with the electronic control coming from the dimmer, even if you would put it at full on. There is a high chance the light will start flickering. If that’s not the case, there’s a good chance the wireless control will be greatly distorted by using dimmers.
So please, use the Innr bulbs with a regular light switch and dim the lights with the Innr app.
For outdoor use, Innr released line of dedicated Outdoor lights to light up the non-rainproof parts of your living space. All other lights aren’t designed to be used outside. But if you’re using them in rain and moisture resistant fixtures, the smart bulbs, candles and GU10’s should be just fine in those, just like regular LED lights. The lights might be more difficult to control because of the larger distance between the lamps and the Bridge, however. Plus, garden light fixtures are often made out of metal, which may distort the signal and make it harder to control the lights.
When you’re using WiFi Lights (so controlling them without the use of a bridge), it shouldn’t be a problem as long as the outdoor fixture is waterproof. Just make sure your WiFi signal reaches your outdoor fixture. Please be aware that all Innr lights can be used between the temperatures of -20° and 40° Celsius / -4° and 104° Fahrenheit.
Go to the Outdoor Lighting page
Getting Started
You can install the app to as many devices as you want. The app is available for Android, iOS and HarmonyOS. The Innr app is compatible with smartphones or tablets with the following operating systems: – iOS 9 and higher – Android 4.1 and higher. The Innr app is not compatible with Windows phones or tablets.
Yes, you can keep using your own lamps and fixtures! We’ll make sure you’ll see them in a whole new light. Innr uses lighting products with a special built-in RF chip so they can communicate with the Innr Bridge. To get the most out of the ‘Smart Lighting’ system, replace your old bulbs with Innr light bulbs, candles and spots. Additionally, The Innr Smart Plug allows you to keep using your current bulbs that don’t have a E14, E27, B22, A19, BR30 or GU10 fitting. However, the Smart Plug won’t be able to dim them, just turn them on and off. Besides that, almost all mains-connected devices can be operated wireless by connecting them with a Smart Plug to your smart system!
Setting up your Innr system
Yes. Your Innr account’s password has the following requirements:
- A minimum of 8 characters.
- A minimum of 1 lowercase letter.
- A minimum of 1 uppercase letter.
- A minimum of 1 number.
That doesn’t really matter, but it would be advisable to use the WiFi network that provides the strongest connection for the Innr bridge.
Open the Innr app, press the + button in the top-right corner of the app and choose “Add Device”. Now scan the QR code on the bridge or, if you can’t scan the QR code, choose “I Can’t Scan” and then choose “Innr Zigbee Bridge”. Then follow the rest of the steps in the App. The App provides on-screen Help to assist you in pairing the bridge.
The flashing (White and Comfort lights) or colour loop (Colour light) indicates that your lights still need to be linked to the Innr app. This is needed to make sure you are the only one in control of your lights, and not your neighbour (and vice versa!). As long as a lamp isn’t linked to the app, it will flash for a few seconds or show a colour loop when turned on. To connect one or multiple lamps, use the app to pair your lights. If you have the Innr Bridge, make sure you’ve connected the Bridge to the app first, before you pair your lights with the app. Watch the video “How to Add an Innr Device to the Innr app” on this page to guide you through the set up.
If the bridge can’t find the light it could be because the light is too far away from the bridge or there are objects between the bridge and the light that are disturbing the wireless signal. In that case, try to bring the light closer to the bridge and make sure there are no big metal objects, fish tanks, microwave ovens or Low-E glass (with reflective coating) between the bridge and the light.
In the specific case of older Innr lights (indicated by a product type number stating with a 1, e.g. RB 185 C) the connection ‘window’ of the light times out around 3-4 seconds after switching on the light. In that case, first let the App start searching for a light and then switch the light Off and On again. The light will blink and the App will then find it within 15-20 seconds.
Control your Innr smart lighting
Yes, you can connect your Innr Smart Button or Remote Control directly to your smart light(s) by following these steps:
Connecting the Innr Smart Button with a lamp:
- Hold the Smart Button close to the lamp you want to connect.
- Press the Smart Button 3 times fast (next press within 0.25 seconds) and hold the third press for 3 seconds.
The LED on the Smart Button will blink once per second.
A lamp from Innr or Philips Hue blinks when connection is successful. If you have a lamp from another brand, the reaction of the lamp when connection is successful may vary.
Repeat these steps for all the lights you would like connected to your Smart Button.
You can now control the connected light(s) from the app and with the Smart Button.
Connecting an Innr Remote Control to a lamp:
- Hold the Remote Control close to the lamp you want to connect.
- Press the middle button and the button with the big sun and hold for 3 seconds.
The LED on the Remote Control will blink once per second.
A lamp from Innr or Philips Hue blinks when connection is successful. If you have a lamp from another brand, the reaction of the lamp when connection is successful may vary.
Repeat these steps for all the lights you would like connected to your Remote Control.
You can now control the connected light(s) from the app and with the Remote Control.
This method is called Touchlink.
Smart Button (RC 210)
- Open the Philips Hue app and start searching for lights.
- Remove the plastic tab to put the Smart Button in pairing mode. The LED on the front will start blinking once per second.
If the LED is not blinking, press and hold the reset button behind the battery for 3 seconds. - The LED will rapidly blink twice to confirm it’s successfully connected. NOTE: The Smart Button will not appear in the Philips Hue app.
- Turn the light off for at least 5 seconds using the wall switch and turn it on again. The light is in pairing mode for 1 minute from now.
- Press the Smart Button 3 times in quick succession, and hold the third press for 3 seconds. The LED on the Smart Button will blink once per second.
- Bring the Smart Button close to the lamp (<10 cm). The light will blink to confirm it’s successfully connected.

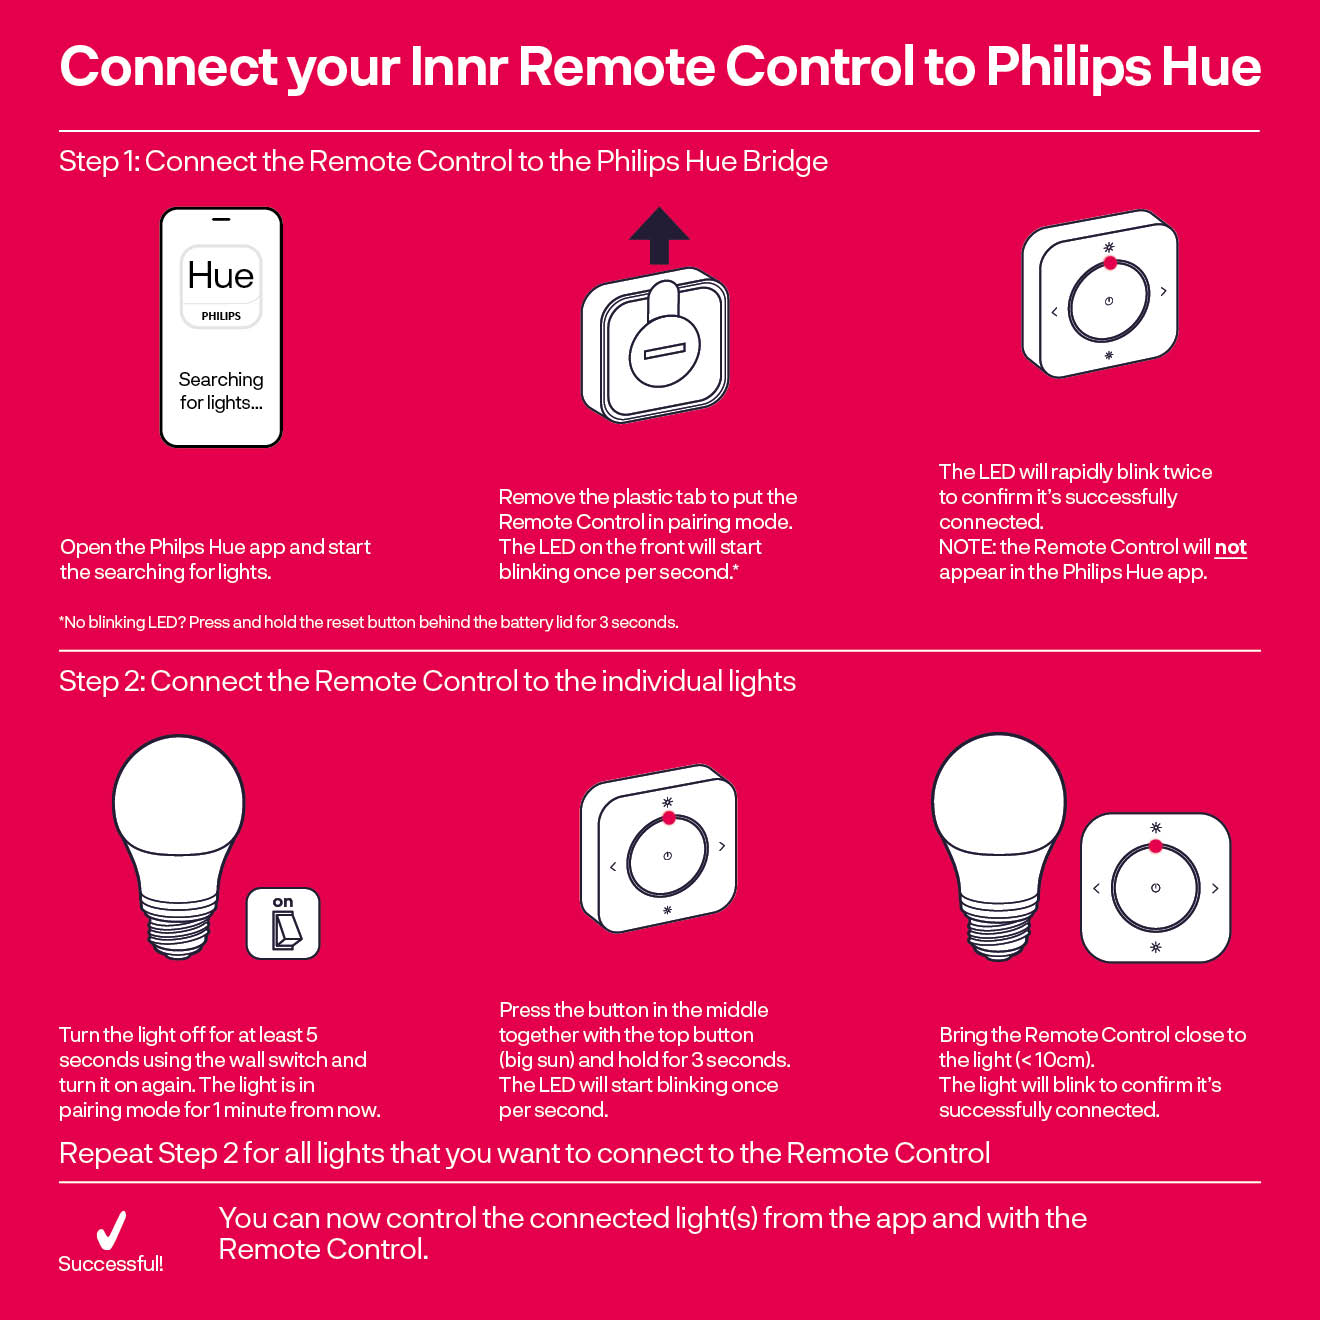
Remote Control (RC 250)
- Open the Philips Hue app and start searching for lights.
- Remove the plastic tab to put the Remote Control in pairing mode. The LED on the front will start blinking once per second.
If the LED is not blinking, press and hold the reset button behind the battery for 3 seconds. - The LED will rapidly blink twice to confirm it’s successfully connected. NOTE: The Remote Control will not appear in the Philips Hue app.
- Turn the light off for at least 5 seconds using the wall switch and turn it on again. The light is in pairing mode for 1 minute from now.
- Press the button in the middle together with the top button (big sun) and hold for 3 seconds. The LED on the Remote Control will blink once per second.
- Bring the Remote Control close to the lamp (<10 cm). The light will blink to confirm it’s successfully connected.
- Hold the remote close to the lamp you want to reset and start the Touchlink reset
- Innr Smart Button: Push the button 4 times and hold the 4th time for 3 seconds.
- Innr Remote Control: Push and hold the middle and lower button at the same time for 3 seconds.
- The LED of the remote will start to blink twice per second.
- Depending on the manufacturer of your lamp, the lamp will give a reaction when the reset has been successful.
With the Innr Smart Button, you can turn lights on and off, dim them, cycle through scenes, and at the moment you can set your 3 favourite scenes as presets on your remote. In the future you will be able to set 5 of your favourite scenes as presets on the Smart Button. With the Innr Remote Control you can do the same, plus cycle through the colours of the rainbow.
Tap the Smart Button once to turn your lights on or off, double tap to cycle through scenes, and push and hold the Smart Button to dim or brighten.
Use the button in the middle to turn your lights on or off, use the upper or lower button to dim your lights, and use the left or right button to cycle through the scenes. Push and hold the left or right button to cycle through the colours of the rainbow.
Yes, you can! Just select the specific light in the app when creating a Routine.
Scenes adjust all the lights in a room at once. Once you’ve added a lamp to a room, it will be automatically be part of the Scenes for that room.
Innr WiFi bulbs
No. The Innr Bridge is not required for WiFi bulbs, you can connect your WiFi bulbs directly to the Innr app.
WiFi bulbs aren’t inherently cheaper than Zigbee bulbs, but the underlying technology is less complicated, with lower system maintenance costs, which in turn means a lower price. Besides, there are lots of low-cost suppliers, because WiFi lamps are easier to make. Overall, these bulbs have lower performance than most Zigbee bulbs.
We have taken several measures to protect the WiFi bulbs (and other WiFi devices) against such abuse. All communication between the lights within the cloud has been encrypted with a unique key. These lights use a modern chipset combined with firmware with the latest security updates. Firmware updates are secured with a signature, so the only updates it accepts are from the Innr cloud.
Furthermore, all communication through the app with lights within your WiFi network are encrypted the same way your other devices in your home network are. Because of safety measures, our WiFi bulbs do not allow using an open WiFi network. It will be your own responsibility to secure your WiFi network, for instance not using a WiFi password that’s easy to guess, and only sharing this password with people you trust.
Operating via Zigbee requires a Bridge or a hub. WiFi doesn’t need those.
Yes! The new Innr app lets you connect WiFi and Zigbee to your system. Just add the Innr Bridge, and you’ll be able to add Zigbee lights and accessories and operate them all with the Innr app in no time!